
OpenStack has seen a lot of PaaS oriented project coming for the last few months. Heat, the orchestration service was introduced during Grizzly, Havana just got the support of the Docker hypervisor and Trove the Database as a Service project is planned for Icehouse. More recently, Manila the Distributed Filesystem as a Service and Raksha the Data Protection As Service appeared.
So, want to bring OpenStack to the next level?
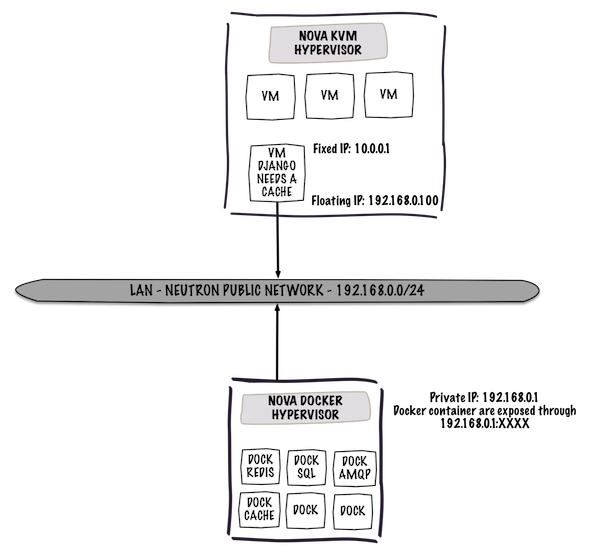
I. The plan
My idea was to add some Docker hypervisors to my OpenStack environment in order to expose PaaS applications to my OpenStack virtual machines. In practice, we would have two distinct zones, one for KVM based hypervisor and another one for Docker hypervisors. The Docker driver for Nova is quite basic and limited and it doesn’t take advantage of the whole OpenStack goodness. For instance, attaching a floating IP address won’t be possible. Thus everytime you boot a new Docker VM, you need to make sure that the image template directly expose the container to the host. Then you will be able to access it from the IP address of the compute host, which in a public cloud context is not really what you want. So for me, and regarding the state of the integration this new driver is clearly private cloud oriented. Private cloud administrator control their platform and then can tweak around those few lacks.
Simple example below:
II. Configure your hypervisor
There is no package for Nova Compute Docker, thus you will have to install Docker and configure nova-compute manually. Follow the official documentation.
II.1. Configure Nova:
$ sudo apt-get install nova-compute -y
You might want to remove KVM here as well…
To enable Docker, ensure the following options are set in /etc/nova/nova-compute.conf on all hosts running the nova-compute service.
compute_driver=docker.DockerDriver
Add the rootwrap filters file /etc/nova/rootwrap.d/docker.filters:
# nova-rootwrap command filters for setting up network in the docker driver
# This file should be owned by (and only-writeable by) the root user

[Filters]
# nova/virt/docker/driver.py: 'ln', '-sf', '/var/run/netns/.*'
ln: CommandFilter, /bin/ln, root
You are good now.
II.2. Configure Glance
Glance also needs to be configured to support the Docker container format, in /etc/glance-api.conf:
container_formats = ami,ari,aki,bare,ovf,docker
II.3. Build your local repository
The local repository can either be a container or directly build on the bare metal. I decided to use a container here since it’s more flexible.
The script stolen and arranged from DevStack :D
#!/bin/bash

OS_USERNAME=admin
OS_PASSWORD=password
OS_TENANT_NAME=admin
OS_AUTH_URL="http://192.168.0.128:5000/v2.0/"

GLANCE_HOSTPORT=192.168.0.128:9292
SERVICE_PROTOCOL=${SERVICE_PROTOCOL:-http}
SERVICE_TIMEOUT=10
SERVICE_HOST=192.168.0.127
DOCKER_REGISTRY_PORT=${DOCKER_REGISTRY_PORT:-5042}
DOCKER_IMAGE=${DOCKER_IMAGE:-http://get.docker.io/images/openstack/docker-ut.tar.gz}
DOCKER_IMAGE_NAME=docker-busybox
DOCKER_REGISTRY_IMAGE=${DOCKER_REGISTRY_IMAGE:-http://get.docker.io/images/openstack/docker-registry.tar.gz}
DOCKER_REGISTRY_IMAGE_NAME=docker-registry
DOCKER_REPOSITORY_NAME=${SERVICE_HOST}:${DOCKER_REGISTRY_PORT}/${DOCKER_IMAGE_NAME}

function is_set() {
    local var=\$"$1"
    eval "[ -n \"$var\" ]" # For ex.: sh -c "[ -n \"$var\" ]" would be better, but several exercises depends on this
}

# Get Docker image
if [[ ! -r docker-ut.tar.gz ]]; then
    (curl -OR $DOCKER_IMAGE)
fi
if [[ ! -r docker-ut.tar.gz ]]; then
    die $LINENO "Docker image unavailable"
fi
docker import - $DOCKER_IMAGE_NAME <docker-ut.tar.gz

# Get Docker registry image
if [[ ! -r docker-registry.tar.gz ]]; then
    (curl -OR $DOCKER_REGISTRY_IMAGE)
fi
if [[ ! -r docker-registry.tar.gz ]]; then
    die $LINENO "Docker registry image unavailable"
fi
docker import - $DOCKER_REGISTRY_IMAGE_NAME <docker-registry.tar.gz

# Start the Docker registry container
docker run -d -p ${DOCKER_REGISTRY_PORT}:5000 \
-e SETTINGS_FLAVOR=openstack -e OS_USERNAME=${OS_USERNAME} \
-e OS_PASSWORD=${OS_PASSWORD} -e OS_TENANT_NAME=${OS_TENANT_NAME} \
-e OS_GLANCE_URL="${SERVICE_PROTOCOL}://${GLANCE_HOSTPORT}" \
-e OS_AUTH_URL=${OS_AUTH_URL} \
$DOCKER_REGISTRY_IMAGE_NAME ./docker-registry/run.sh


echo "Waiting for docker registry to start..."
DOCKER_REGISTRY=${SERVICE_HOST}:${DOCKER_REGISTRY_PORT}
if ! timeout $SERVICE_TIMEOUT sh -c "while ! curl -s $DOCKER_REGISTRY; do sleep 1; done"; then
        die $LINENO "docker-registry did not start"
fi

# Tag image if not already tagged
if ! docker images | grep $DOCKER_REPOSITORY_NAME; then
        docker tag $DOCKER_IMAGE_NAME $DOCKER_REPOSITORY_NAME
fi

# Make sure we copied the image in Glance
DOCKER_IMAGE=$(glance image-list | egrep " $DOCKER_IMAGE_NAME ")
if ! is_set DOCKER_IMAGE ; then
    docker push $DOCKER_REPOSITORY_NAME
fi
Basically the script will:
- Download a dummy image and the registry image
- Import both of them
- Execute the container registry
- Import the dummy image into your private registry
- The registry will import the dummy image into Glance
Don’t forget to adapt the following variables:
OS_USERNAMEOS_PASSWORDOS_TENANT_NAMEOS_AUTH_URLGLANCE_HOSTPORTSERVICE_HOST
After the execution of the script you should have this dummy image into Glance:
$ glance image-list
+--------------------------------------+-----------------------+-------------+------------------+----------+--------+
| ID                                   | Name                  | Disk Format | Container Format | Size     | Status |
+--------------------------------------+-----------------------+-------------+------------------+----------+--------+
| a7d33732-0751-4615-9fdd-3304dbef82c8 | docker-busybox:latest | raw         | docker           | 2272071  | active |
+--------------------------------------+-----------------------+-------------+------------------+----------+--------+
III. The PaaS Zone
III.1 Host aggregates and Availability Zones
Create two aggregates. The first one is for your traditional KVM hypervisors and the second one for your Docker hypervisors.
$ nova aggregate-create kvm
$ nova aggregate-create docker
After this add your hypervisors within those aggregates:
$ nova aggregate-add-host kvm compute-kvm-01
$ nova aggregate-add-host docker compute-docker-01
Check the result:
$ nova availability-zone-list
+-----------------------+----------------------------------------+
| Name                  | Status                                 |
+-----------------------+----------------------------------------+
| nova                  | available                              |
| |- compute-docker-01  |                                        |
| | |- nova-compute     | enabled :-) 2013-10-26T00:56:20.618542 |
| |- compute-kvm-01     |                                        |
| | |- nova-compute     | enabled :-) 2013-10-27T14:32:39.929370 |
+-----------------------+----------------------------------------+
Boot your PaaS service:
$ nova boot --image docker-busybox:latest --flavor m1.micro --availability-zone nova:docker vm-docker

$ docker ps
ID                  IMAGE                                      COMMAND                CREATED             STATUS              PORTS
ee93c1b68cbd        192.168.0.127:5042/docker-busybox:latest   sh                     8 seconds ago       Up 7 seconds

$ nova list
+--------------------------------------+-----------+--------+------------+-------------+----------+
| ID                                   | Name      | Status | Task State | Power State | Networks |
+--------------------------------------+-----------+--------+------------+-------------+----------+
| 8e8002d6-0367-400d-8a33-2d49db88e723 | vm-docker | ACTIVE | None       | Running     |          |
+--------------------------------------+-----------+--------+------------+-------------+----------+
III.2. PaaS Applications
Let’s start with something simple like Memcached.
First download the image on your local repository.
$ sudo docker pull bacongobbler/memcached
Then tag and push it to your private OpenStack repository:
$ sudo docker tag bacongobbler/memcached 192.168.0.127:5042/memcached
$ sudo docker push 192.168.0.127:5042/memcached
Check that the image has been successfully uploaded:
$ glance image-list
+--------------------------------------+-----------------------+-------------+------------------+----------+--------+
| ID                                   | Name                  | Disk Format | Container Format | Size     | Status |
+--------------------------------------+-----------------------+-------------+------------------+----------+--------+
| 7bc2dbf0-9b31-4d95-8310-3e4811fc73f8 | memcached:latest      | raw         | docker           | 174      | active |
| 25399fef-1981-48b3-a189-14477ac563bf | None                  | raw         | docker           | 71450400 | active |
| adbcf115-da1e-4b8a-896d-33cde0e0e866 | None                  | raw         | docker           | 178      | active |
| 1a5d4661-7d4e-476b-b3a5-1b32494e9b1a | None                  | raw         | docker           | 8960406  | active |
| 323cf91e-ea57-4349-a788-2eb32bc27151 | None                  | raw         | docker           | 19324273 | active |
| 68fe793f-587d-4a3d-a9f7-dc7d31e46fc6 | None                  | raw         | docker           | 177      | active |
+--------------------------------------+-----------------------+-------------+------------------+----------+--------+
Eventually boot your instance:
$ nova boot --image memcached:latest --flavor m1.tiny --availability-zone nova:docker memcached
Quick final check:
$ nova list
+--------------------------------------+-----------+--------+------------+-------------+----------+
| ID                                   | Name      | Status | Task State | Power State | Networks |
+--------------------------------------+-----------+--------+------------+-------------+----------+
| 0e1604b5-9373-42f6-a338-de20fa340dcf | memcached | ACTIVE | None       | Running     |          |
+--------------------------------------+-----------+--------+------------+-------------+----------+

$ sudo docker ps
ID                  IMAGE                                      COMMAND                CREATED             STATUS              PORTS
76ac56e14ec5        192.168.0.127:5042/memcached:latest        memcached -u daemon    1 seconds ago       Up 1 seconds        49162->11211
Some final thoughts. The state of the integration is not that bad for a newcomer. However as mentionned in the introduction, the Nova Docker hypervisor is not a perfect fit for now. In practice, you will definitely need to workaround it in order to provide a good service.