Setup MySQL master-master replication with Galera
I. Galera introduction
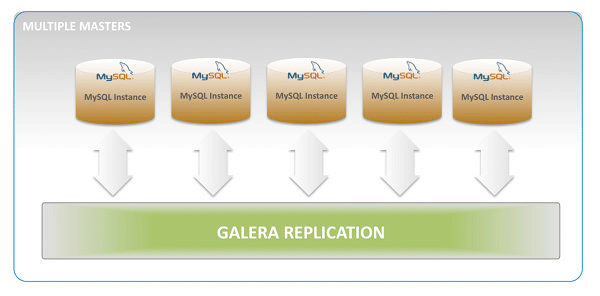
MySQL/Galera is synchronous multi-master cluster for MySQL/InnoDB database. The application which commonly had access to your cluster can commit on each server, then Galera will replicate all the data accross the whole cluste. A commit is called an RBS event. For the high-availability purpose Galera needs a minimum of 3 machines even if it is able to work with 2 nodes. There are several replication methods like mysqldump (default) and Rsync. In order to manage the queue and the replication system, Galera uses a Certification-based replication feature. This functionnality provides an alternative againts the classic replication methods.
How does it work?
        clients
        |  |  |
        V  V  V
  ,----------------.
  |                |
  |   application  | <-- e.g. MySQL server
  |                |
  ================== <-- wsrep API
  | wsrep provider | <-- e.g. Galera
  `----------------'
           |
           V
replication to other nodes
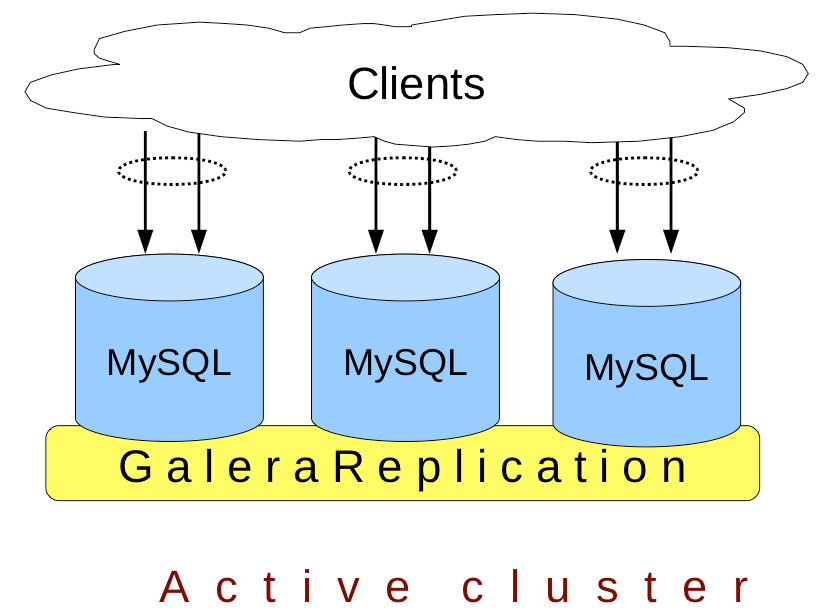
- Application writes on any node
- The commit is replicated through the other nodes. Each transaction had an ID
- True parallel replication, on row level and ID check
Most relevant features:
- Synchronous replication
- Easy to scale
- Automatic node joining
- Automatic membership control, failed nodes drop from the cluster
- Active-active multi-master topology
- No SPOF
- Performance oriented
If you want to know more about the topologies you can built, see this page et ici
II. Setting up master-master replication
Our topology:
   ,-------------.
   | application |
   `-------------'
        | | |        DB backups
      ,-------. ,-------. ,-------.
      | node1 | | node2 | | node3 |
      `-------' `-------' `-------'
       <===== cluster nodes replication =====>
II.1. Machine preparation
###II.1.1. Galera node 01, 02, 03
Local name resolution:
127.0.0.1	localhost
127.0.0.1	galera-node01
127.0.1.1	galera-node01
10.0.0.1	galera-node01
10.0.0.2	galera-node02

# The following lines are desirable for IPv6 capable hosts
::1     ip6-localhost ip6-loopback
fe00::0 ip6-localnet
ff00::0 ip6-mcastprefix
ff02::1 ip6-allnodes
ff02::2 ip6-allrouters
NIC parameters:
# This file describes the network interfaces available on your system
# and how to activate them. For more information, see interfaces(5).

# The loopback network interface
auto lo
iface lo inet loopback

# The primary network interface
auto eth0
iface eth0 inet dhcp

auto eth1
iface eth1 inet static
address 10.0.0.1
netmask 255.0.0.0
At the end we have:
galera-node01 – 10.0.0.1
galera-node02 – 10.0.0.2
II.2. Setting up MySQL ang Galera replicator
Some pre-requites:
WARNING: do those manipulations on both nodes
Download the .deb:
galera-node01:~$ wget https://launchpad.net/codership-mysql/5.5/5.5.20-23.4/+download/mysql-server-wsrep-5.5.20-23.4-i386.deb
galera-node01:~$ wget https://launchpad.net/galera/2.x/23.2.0/+download/galera-23.2.0-i386.deb
galera-node01:~$ ls
galera-23.2.0-i386.deb  mysql-server-wsrep-5.5.20-23.4-i386.deb
Install them:
galera-node01:~$ sudo dpkg -i mysql-server-wsrep-5.5.20-23.4-i386.deb galera-23.2.0-i386.deb
Fix the dependency issue:
galera-node01:~$ sudo apt-get -f install -y
###II.2.1. MySQL configuration
WARNING: do those manipulations on both nodes
Launch MySQL:
galera-node01:~$ sudo mysqld_safe &
galera-node01:~$ sudo mysql_secure_installation

NOTE: RUNNING ALL PARTS OF THIS SCRIPT IS RECOMMENDED FOR ALL MySQL
      SERVERS IN PRODUCTION USE!  PLEASE READ EACH STEP CAREFULLY!

In order to log into MySQL to secure it, we'll need the current
password for the root user.  If you've just installed MySQL, and
you haven't set the root password yet, the password will be blank,
so you should just press enter here.

Enter current password for root (enter for none):
OK, successfully used password, moving on...

Setting the root password ensures that nobody can log into the MySQL
root user without the proper authorisation.

Set root password? [Y/n] Y
New password:
Re-enter new password:
Password updated successfully!
Reloading privilege tables..
 ... Success!

By default, a MySQL installation has an anonymous user, allowing anyone
to log into MySQL without having to have a user account created for
them.  This is intended only for testing, and to make the installation
go a bit smoother.  You should remove them before moving into a
production environment.

Remove anonymous users? [Y/n] Y
 ... Success!

Normally, root should only be allowed to connect from 'localhost'.  This
ensures that someone cannot guess at the root password from the network.

Disallow root login remotely? [Y/n] Y
 ... Success!

By default, MySQL comes with a database named 'test' that anyone can
access.  This is also intended only for testing, and should be removed
before moving into a production environment.

Remove test database and access to it? [Y/n] Y
 - Dropping test database...
 ... Success!
 - Removing privileges on test database...
 ... Success!

Reloading the privilege tables will ensure that all changes made so far
will take effect immediately.

Reload privilege tables now? [Y/n] Y
 ... Success!

Cleaning up...

All done!  If you've completed all of the above steps, your MySQL
installation should now be secure.

Thanks for using MySQL!
Modify the bind-address parameter with the host-only NIC (eth1):
galera-node01:~$ sudo sed -i s/'127.0.0.1'/'10.0.0.1'/ /etc/mysql/my.cnf
The sed command simply does this on the node 01:
bind-address = 10.0.0.1
Don’t forget the second node.
##II.2.2. Galera configuration for a 2 nodes cluster
We configure the Galera replicator in /etc/mysq/conf.d/wsrep.cnf with:
wsrep_provider=/usr/lib/galera/libgalera_smm.so
wsrep_cluster_address="gcomm://"
wsrep_sst_method=rsync
On the second node:
wsrep_provider=/usr/lib/galera/libgalera_smm.so
wsrep_cluster_address="gcomm://10.0.0.1"
wsrep_sst_method=rsync
We kill the temporary process and relaunch MySQL from the INIT script:
galera-node01:~$ sudo killall mysqld_safe
galera-node01:~$ sudo service mysql restart
 * Stopping MySQL database server mysqld
   ...done.
 * Starting MySQL database server mysqld
   ...done.
Enter the MySQL shell, check the MySQL and wsrep version:
galera-node01:~$ mysql -u root -p
Enter password:
Welcome TO the MySQL monitor.  Commands END WITH ; OR \g.
Your MySQL connection id IS 6
Server version: 5.5.20 SOURCE distribution, wsrep_23.4.r3713

Copyright (c) 2000, 2010, Oracle AND/OR its affiliates. ALL rights reserved.
This software comes WITH ABSOLUTELY NO WARRANTY. This IS free software,
AND you are welcome TO MODIFY AND redistribute it UNDER the GPL v2 license

TYPE 'help;' OR '\h' FOR help. TYPE '\c' TO clear the CURRENT INPUT statement.

mysql> SHOW STATUS LIKE 'wsrep%';
+----------------------------+--------------------------------------+
| Variable_name              | VALUE                                |
+----------------------------+--------------------------------------+
| wsrep_local_state_uuid     | d168c724-6907-11e1-0800-eeea6ebeb9e7 |
| wsrep_protocol_version     | 3                                    |
| wsrep_last_committed       | 0                                    |
| wsrep_replicated           | 0                                    |
| wsrep_replicated_bytes     | 0                                    |
| wsrep_received             | 82                                   |
| wsrep_received_bytes       | 6360                                 |
| wsrep_local_commits        | 0                                    |
| wsrep_local_cert_failures  | 0                                    |
| wsrep_local_bf_aborts      | 0                                    |
| wsrep_local_replays        | 0                                    |
| wsrep_local_send_queue     | 0                                    |
| wsrep_local_send_queue_avg | 0.000000                             |
| wsrep_local_recv_queue     | 0                                    |
| wsrep_local_recv_queue_avg | 0.012195                             |
| wsrep_flow_control_paused  | 0.000000                             |
| wsrep_flow_control_sent    | 0                                    |
| wsrep_flow_control_recv    | 0                                    |
| wsrep_cert_deps_distance   | 0.000000                             |
| wsrep_apply_oooe           | 0.000000                             |
| wsrep_apply_oool           | 0.000000                             |
| wsrep_apply_window         | 0.000000                             |
| wsrep_commit_oooe          | 0.000000                             |
| wsrep_commit_oool          | 0.000000                             |
| wsrep_commit_window        | 0.000000                             |
| wsrep_local_state          | 4                                    |
| wsrep_local_state_comment  | Synced (6)                           |
| wsrep_cert_index_size      | 0                                    |
| wsrep_cluster_conf_id      | 33                                   |
| wsrep_cluster_size         | 2                                    |
| wsrep_cluster_state_uuid   | d168c724-6907-11e1-0800-eeea6ebeb9e7 |
| wsrep_cluster_status       | PRIMARY                              |
| wsrep_connected            | ON                                   |
| wsrep_local_index          | 0                                    |
| wsrep_provider_name        | Galera                               |
| wsrep_provider_vendor      | Codership Oy <info@codership.com>    |
| wsrep_provider_version     | 23.2.0(r120)                         |
| wsrep_ready                | ON                                   |
+----------------------------+--------------------------------------+
38 ROWS IN SET (0.10 sec)
For the whole value details
The most important value is:
wsrep_ready | ON
If wsrep_ready is ON, it works! You also have to check the wsrep_cluster_size parameter. If wsrep_ready is ON and wsrep_cluster_size is egal to number of the nodes, then your cluster is properly working. Sometimes wsrep_ready is ON and your wsrep_cluster_size is egal to 1. This situation is pretty bad because you obviously are in a split brain situation. To solve this verify your gcomm:// urls and restart MySQL.
I wrote a simple bash script to check this:
The simpliest way to avoid any split-brain situation is to setup the garbd daemon like so. Ideally the daemon will be running on an extra server, a load-balancer for example:
$ garbd -a gcomm://10.0.0.1:4567 -g my_wsrep_cluster -l /tmp/1.out -d
Simply choose one of your 2 nodes and garbd will do the rest. It will automatically connect to the second node and will be a member of the cluster. Thus your wsrep_cluster_size variable should be 3. If the dedicated link between the 2 nodes goes down, garbd will act as a replication relay, this can be really useful.
mysql> SHOW STATUS LIKE 'wsrep_cluster_size' ;"
+--------------------+-------+
| Variable_name      | Value |
+--------------------+-------+
| wsrep_cluster_size | 3     |
+--------------------+-------+
This script will perform a simple check of your galera state:
#!/bin/bash

echo "Enter your MySQL user"
read MYSQL_USER

echo "Enter your MySQL password"
stty -echo
read MYSQL_PASSWD
stty echo

STATUS=$(mysql -u$MYSQL_USER -p$MYSQL_PASSWD -N -s -e "show status like 'wsrep_ready';" | awk '{print $2}')
SIZE=$(mysql -u$MYSQL_USER -p$MYSQL_PASSWD -N -s -e "show status like 'wsrep_cluster_size' ;" | awk '{print $2}' | sed -n '2p')

if [[ ${STATUS} = "ON" ]] ; then
	if [[ ${SIZE} -lt 2 ]] ; then
        	echo "Split-brain!"
	else
		echo "Galera is perfectly working"
	fi
else
        echo "The replication is NOT working"
fi
The connection is well established between the nodes:
galera-node01:~$ sudo netstat -plantu | grep mysqld | grep ESTABLISHED
tcp    0   0 10.0.0.1:4567     10.0.0.2:43370     ESTABLISHED 15082/mysqld
tcp    0   0 10.0.0.1:39691    10.0.0.10:4567     ESTABLISHED 13929/mysqld
And garbd also:
$ sudo netstat -plantu | grep garb
tcp        0      0 0.0.0.0:4567            0.0.0.0:*               LISTEN      7026/garbd
tcp        0      0 10.0.0.10:4567        10.0.0.1:39691        ESTABLISHED 7026/garbd
tcp        0      0 10.0.0.10:4567        10.0.0.1:45749        ESTABLISHED 7026/garbd
Here the 10.0.0.10 address is the address of the third machine, the one which host the garbd daemon.
Check the replication by creating databases, tables and fields :).
Important note: when your 2 node replication is setup, change the address of the node with this gcomm:// address by gcomm://other_node_address. You only have to use this address during the installation process. In our setup, it’s the node 01.
At the end you should have this:
- node 01:
gcomm://10.0.0.2 - node 02:
gcomm://10.0.0.1
If the node 01 goes down, the second node will continue to perform commits, when the node 01 will get back to life it will automatically synchronise with the node 02 and vice et versa. A kind of ‘cross replication’.
###II.2.3. Add a new node
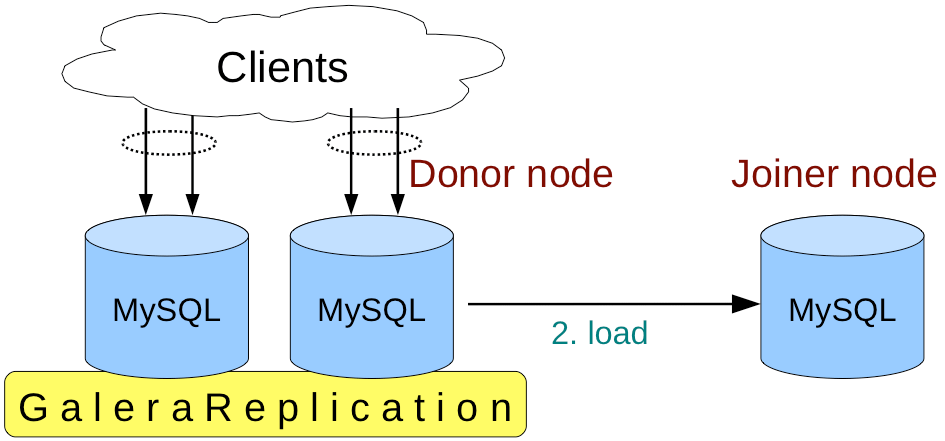
When you add a new node, the new one is called joiner and the node which replicate is called donnor. To add a new node you have to:
- Install the codership MySQL version
- Install Galera
- Configure the
gcomm://address with thedonnorIP address
After that:
- The new node will request the
donnorusing a SST request. - The state of the requested node will change from
JOINEDtoDONOR - The
donnor, will perform a mysqldump or a rsync sync. It depends on the SST methods in use. The SST method also implies several things. For instance both methods mysqldump and rsync are blocking option. It means that during the operation the tables will be lock on the DONOR node and only on this node, the other nodes of the cluster will be available on write. The donor will have a READ-ONLY state until the end of the process. - The
donnorwill load this dump on the new node.
###II.2.4. Using replication through SSL
Since the 0.8 version Galera provides the SSL replication, it prevents man-in-the-middle attacks and also a powerful authentication system based on certificates. It’s a really convenient way to allow specific nodes to connect the cluster. For this purpose we have to active those options:
mysql> SHOW VARIABLES LIKE 'wsrep_provider_options' \G;
*************************** 1. ROW ***************************
Variable_name: wsrep_provider_options
        VALUE: base_port = 4567; evs.debug_log_mask = 0x1; evs.inactive_check_period = PT0.5S; evs.inactive_timeout = PT15S; evs.info_log_mask = 0; evs.install_timeout = PT15S; evs.join_retrans_period = PT0.3S; evs.keepalive_period = PT1S; evs.max_install_timeouts = 1; evs.send_window = 4; evs.stats_report_period = PT1M; evs.suspect_timeout = PT5S; evs.use_aggregate = TRUE; evs.user_send_window = 2; evs.version = 0; evs.view_forget_timeout = PT5M; gcache.dir = /var/lib/mysql/; gcache.keep_pages_size = 0; gcache.mem_size = 0; gcache.name = /var/lib/mysql//galera.cache; gcache.page_size = 128M; gcache.SIZE = 128M; gcs.fc_debug = 0; gcs.fc_factor = 0.5; gcs.fc_limit = 16; gcs.fc_master_slave = NO; gcs.max_packet_size = 64500; gcs.max_throttle = 0.25; gcs.recv_q_hard_limit = 2147483647; gcs.recv_q_soft_limit = 0.25; gmcast.listen_addr = tcp://0.0.0.0:4567; gmcast.mcast_addr = ; gmcast.mcast_ttl = 1; gmcast.peer_timeout = PT3S; gmcast.time_wait = PT5S; gmcast.version = 0; ist.recv_addr = 192.168.146.160; pc.checksum = TRUE; pc.ignore_quorum = FALSE; pc.ignore_sb = FALSE; pc.linger = PT2S; pc.npvo = FALSE; pc.version = 0; protonet.backend = asio; protonet.version = 0; replicator.causal_read_timeout = PT30S; replicator.commit_order = 3
1 ROW IN SET (0.00 sec)
Generate your certs and copy them to the others nodes:
galera-node01:~/cert$ openssl req -new -x509 -days 365000 -nodes -keyout key.pem -out cert.pem
Generating a 1024 bit RSA private key
.......................++++++
.................++++++
writing new private key to 'key.pem'
-----
You are about to be asked to enter information that will be incorporated
into your certificate request.
What you are about to enter is what is called a Distinguished Name or a DN.
There are quite a few fields but you can leave some blank
For some fields there will be a default value,
If you enter '.', the field will be left blank.
-----
Country Name (2 letter code) [AU]:
State or Province Name (full name) [Some-State]:
Locality Name (eg, city) []:
Organization Name (eg, company) [Internet Widgits Pty Ltd]:
Organizational Unit Name (eg, section) []:
Common Name (eg, YOUR name) []:
Email Address []:

galera-node01:~/cert$ scp *pem ubuntu@galera-node02:/home/ubuntu
ubuntu@192.168.146.160's password:
cert.pem                                                                                                                                                                                                  100%  875     0.9KB/s   00:00
key.pem                                                                                                                                                                                                   100%  916     0.9KB/s   00:00

galera-node01:~/cert$ scp *pem ubuntu@galera-node03:/home/ubuntu
ubuntu@192.168.146.160's password:
cert.pem                                                                                                                                                                                                  100%  875     0.9KB/s   00:00
key.pem
We also modify the /etc/mysql/conf.d/wsrep.cnf file and enable the wsrep_provider_optionsparameter:
wsrep_provider_options="socket.ssl_cert = <chemin_cert_file>; socket.ssl_key = <chemin_key_file>"
Be careful, here we have to restart from the beginning. Why? If we configure SSL, it means we have to do it on each server. Thereby we will modify each configuration file for each server. What will happened?
- Modify the configuration for SSL on the node 01
- Relaunch MySQL
- The node 01 try to connect to the other using SSL
- Oh snap! Doesn’t work :(
- Each serve will go down, one by one
The only way is to start like this:
$ sudo mysqld --wsrep_cluster_address=gcomm:// --wsrep_sst_method=rsync --wsrep_provider_options="socket.ssl_cert = <chemin_cert_file>; socket.ssl_key = <chemin_key_file>" &
Un-allowed node will end up with this log message:
[ERROR] WSREP: handshake failed for 0xa9660b8: 1
We re-create the cluster! Now launch all the node one by one. During the connection, here some trace about ssl negociation:
120312 16:08:07 [Note] WSREP: gcomm: connecting to group 'my_wsrep_cluster', peer '10.0.0.1:'
120312 16:08:07 [Note] WSREP: SSL handshake successful, remote endpoint ssl://10.0.0.1:4567 local endpoint ssl://10.0.0.2:41636 cipher: AES128-SHA compression: zlib compression
We can also check that in MySQL, this is not the real output, I just kept the lines which make sense:
$ mysql -uroot -proot -e "SHOW VARIABLES LIKE 'wsrep_provider_options';" -E
Value: socket.ssl = YES; socket.ssl_ca = /home/ubuntu/cert/cert.pem;
socket.ssl_cert = /home/ubuntu/cert/cert.pem
; socket.ssl_cipher = AES128-SHA; socket.ssl_compression = YES
; socket.ssl_key = /home/ubuntu/cert/key.pem
Actives connections between all nodes:
ubuntu@galera-node01:~$ sudo netstat -plantu | grep 10.0
tcp        0      0 10.0.0.1:4567           10.0.0.3:32820          ESTABLISHED 5783/mysqld
tcp        0      0 10.0.0.1:4567           10.0.0.2:41640          ESTABLISHED 5783/mysqld
III. Stop, think and tips
After my Galera Cluster was up and running, I had plenty of questions, some of them:
III.1. How galera prevents split-brain situation?
Split-brain is a state in which all the nodes of a cluster cannot determinate there membership. If a node is down for a couple of second due to a network issue, an other may think that this one is down and want to take the lead and launch the service. Each node in the cluster may mistakenly decide to run the service but the others nodes are still running. This will cause data corruption and duplicate instance. The solution offered by Galera is to use a little daemon called garbd, a stateless daemon create to avoid split-brain. This daemon is a part of the Galera replicator. As I previously said, the garbd daemon will be a member of the cluster and can act as a replication relay if the dedicated link between the nodes goes down.
Example usage:
              ,---------.
              |  garbd  |
              `---------'
   ,---------.     |     ,---------.
   | clients |     |     | clients |
   `---------'     |     `---------'
              \    |    /
               \ ,---. /
               ('     `)
              (   WAN   )
               (.     ,)
               / `---' \
              /         \
   ,---------.           ,---------.
   |  node1  |           |  node2  |
   `---------'           `---------'
   Data Center 1         Data Center 2
III.2. What happens if a node goes down?
No matter your topology (2 or more node). For example, if the node 02 goes down, the one with the gcomm://another_node_ipaddress, the data will keep be replicate to the other node. When the node 02 will go back, the data will be commited.
III.3. Change your gcomm:// address without downtime
For this purpose you have to change a variable in MySQL:
mysql> SHOW VARIABLES LIKE 'wsrep_cluster_address';
+-----------------------+------------------+
| Variable_name         | VALUE            |
+-----------------------+------------------+
| wsrep_cluster_address | gcomm://10.0.0.3 |
+-----------------------+------------------+
1 ROW IN SET (0.00 sec)

mysql> SET GLOBAL wsrep_cluster_address='gcomm://10.0.0.2';
Query OK, 0 ROWS affected (3.51 sec)

mysql> SHOW VARIABLES LIKE 'wsrep_cluster_address';
+-----------------------+------------------+
| Variable_name         | VALUE            |
+-----------------------+------------------+
| wsrep_cluster_address | gcomm://10.0.0.2 |
+-----------------------+------------------+
1 ROW IN SET (0.00 sec)
III.4. Check your version
Check your MySQL version:
mysql> SHOW GLOBAL VARIABLES LIKE 'version';
+---------------+--------+
| Variable_name | VALUE  |
+---------------+--------+
| version       | 5.5.20 |
+---------------+--------+
1 ROW IN SET (0.00 sec)
Check your wsrep version:
mysql> SHOW GLOBAL STATUS LIKE 'wsrep_provider_version';
+------------------------+--------------+
| Variable_name          | VALUE        |
+------------------------+--------------+
| wsrep_provider_version | 23.2.0(r120) |
+------------------------+--------------+
1 ROW IN SET (0.00 sec)
For listing the whole options simply use:
mysql> SHOW VARIABLES LIKE 'wsrep%' ;" -E
*************************** 1. row ***************************
Variable_name: wsrep_OSU_method
        Value: TOI
*************************** 2. row ***************************
Variable_name: wsrep_auto_increment_control
        Value: ON
*************************** 3. row ***************************
Variable_name: wsrep_causal_reads
        Value: OFF
*************************** 4. row ***************************
Variable_name: wsrep_certify_nonPK
        Value: ON
*************************** 5. row ***************************
Variable_name: wsrep_cluster_address
        Value: gcomm://10.0.0.2
*************************** 6. row ***************************
Variable_name: wsrep_cluster_name
        Value: my_wsrep_cluster
*************************** 7. row ***************************
Variable_name: wsrep_convert_LOCK_to_trx
        Value: OFF
*************************** 8. row ***************************
Variable_name: wsrep_data_home_dir
        Value: /var/lib/mysql/
*************************** 9. row ***************************
Variable_name: wsrep_dbug_option
        Value:
*************************** 10. row ***************************
Variable_name: wsrep_debug
        Value: OFF
*************************** 11. row ***************************
Variable_name: wsrep_drupal_282555_workaround
        Value: OFF
*************************** 12. row ***************************
Variable_name: wsrep_forced_binlog_format
        Value: NONE
*************************** 13. row ***************************
Variable_name: wsrep_max_ws_rows
        Value: 131072
*************************** 14. row ***************************
Variable_name: wsrep_max_ws_size
        Value: 1073741824
*************************** 15. row ***************************
Variable_name: wsrep_node_address
        Value:
*************************** 16. row ***************************
Variable_name: wsrep_node_incoming_address
        Value: 192.168.146.159:3306
*************************** 17. row ***************************
Variable_name: wsrep_node_name
        Value: galera-node01
*************************** 18. row ***************************
Variable_name: wsrep_notify_cmd
        Value:
*************************** 19. row ***************************
Variable_name: wsrep_on
        Value: ON
*************************** 20. row ***************************
Variable_name: wsrep_provider
        Value: /usr/lib/galera/libgalera_smm.so
*************************** 21. row ***************************
Variable_name: wsrep_provider_options
        Value: base_port = 4567; evs.debug_log_mask = 0x1; evs.inactive_check_period = PT0.5S; evs.inactive_timeout = PT15S; evs.info_log_mask = 0; evs.install_timeout = PT15S; evs.join_retrans_period = PT0.3S; evs.keepalive_period = PT1S; evs.max_install_timeouts = 1; evs.send_window = 4; evs.stats_report_period = PT1M; evs.suspect_timeout = PT5S; evs.use_aggregate = true; evs.user_send_window = 2; evs.version = 0; evs.view_forget_timeout = PT5M; gcache.dir = /var/lib/mysql/; gcache.keep_pages_size = 0; gcache.mem_size = 0; gcache.name = /var/lib/mysql//galera.cache; gcache.page_size = 128M; gcache.size = 128M; gcs.fc_debug = 0; gcs.fc_factor = 0.5; gcs.fc_limit = 16; gcs.fc_master_slave = NO; gcs.max_packet_size = 64500; gcs.max_throttle = 0.25; gcs.recv_q_hard_limit = 2147483647; gcs.recv_q_soft_limit = 0.25; gmcast.listen_addr = tcp://0.0.0.0:4567; gmcast.mcast_addr = ; gmcast.mcast_ttl = 1; gmcast.peer_timeout = PT3S; gmcast.time_wait = PT5S; gmcast.version = 0; ist.recv_addr = 192.168.146.159; pc.checksum = true; pc.ignore_quorum = false; pc.ignore_sb = false; pc.linger = PT2S; pc.npvo = false; pc.version = 0; protonet.backend = asio; protonet.version = 0; replicator.causal_read_timeout = PT30S; replicator.commit_order = 3
*************************** 22. row ***************************
Variable_name: wsrep_retry_autocommit
        Value: 1
*************************** 23. row ***************************
Variable_name: wsrep_slave_threads
        Value: 1
*************************** 24. row ***************************
Variable_name: wsrep_sst_auth
        Value: ********
*************************** 25. row ***************************
Variable_name: wsrep_sst_donor
        Value:
*************************** 26. row ***************************
Variable_name: wsrep_sst_method
        Value: rsync
*************************** 27. row ***************************
Variable_name: wsrep_sst_receive_address
        Value: AUTO
*************************** 28. row ***************************
Variable_name: wsrep_start_position
        Value: 00000000-0000-0000-0000-000000000000:-1
Check all the parameters here
In my next article, I will setup HAProxy on top of this cluster. HAProxy will provide load-balancing and a virtual IP address.